 Yummy! Look what came in the mail today; Sinopia dry pigments for encaustic. They are so beautiful lined up on the shelf next to my wax area. I just had to share.
 And another journal page. That too.
 I was inspired yesterday to shoot several pictures along the Willamette River. I drive this route every time I go to town and it is full of great old buildings. This abandoned Marina was flooded out when the Willamette breached it banks a few years back. It occurs to me that much of what exists along this old stretch of highway is disappearing.
 A few days ago I promised you a tutorial on making a journal out of used grocery bags which I think are a great material to recycle. Well, here we go. First you carefully open the seams of the grocery bags. (or you can just rip them open like I did)
 Tear them to size. My size was 10" x 15 1/2 ". They'll be folded in half. I got 3 sheets that size out of each bag so it took 6 bags to make the journal.
 Next I soaked each sheet in water and squeezed it out. Then I hung the sheets on a rod in my studio to dry.
 Next I ironed out each sheet with a little spray and my iron.
 Here are all the sheets folded and stacked into 3 signatures of 6 each.
 After sewing the signatures in a coptic stitch (there are many tutorials on that online. Just google "coptic stitch" and choose one) ---
 I cut a sheet of tarleton (use whatever you have. Fabric, cheesecloth - I happen to have tarleton because I'm a printmaker but I would have used anything else that presented itself equally) - anyhow, cut a piece of something and get a sheet of cardboard to fashion a spine so you'll know which end of the book is which.
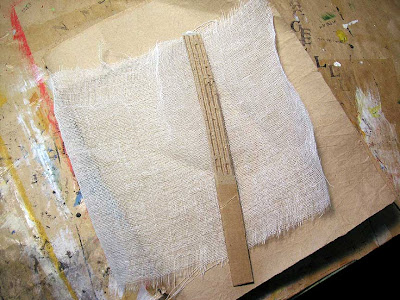 Here is the spine cut out. Dont measure. This isn't that kind of a book.
 Slather gel this way and that until the spine is roughly in the spinal area and the fabric is glued to the cover.
 Let it dry. It's gonna be a wet puppy.
 Ta Da! You now have a floppy, friendly, fabulous book in which to gather up all your ideas and flotsam. Throw it in your purse, let your friends draw in it, do anything but treat it like it's a big deal. This journal is just for sloppiness. (come to the wild side!!)
 Another shot of 99E looking south toward the motel that has never been open in the 10 years I've lived here. We refer to it as the Bates Motel and joke that the government uses it as a witness relocation house. You never see anyone outside but the roses are always pruned. Very straaaaange.
Ciao!









65 comments:
What a great tutorial, Judy. Thanks for sharing it. I love brown grocery bags; they are so humble and crinkly and good. I enjoy looking on the bottoms for the inspector's name. Hope you have those in Oregon.
That's a fun tutorial, Judy. And congratulations on the GORGEOUS article in cloth paper scissors. Your paintings never looked more beautiful!
Love the photos of the mysterious places along your route! Strange that seems to be common along old Oregon rivers where mining towns used to thrive. We have a few in our neck 'o the woods...Southern Oregon.
You're tutorial is great! I'm kinda weird, though, because for some strange reason, I just LOVE ironed out, previously "wetted" paper! I love it...ever since I was little I use to love it when my school notebooks would get wet and then I'd iron out the pages and savor the different kind of crackling sound they made!
Makes me wanna go iron some paper! :)
Love those journal pages---they just get better & better. And your "tutorial" was just what I needed. I love when you say "don't measure that spine..this isn't that kind of book" Ha Ha What fun! So do you then leave the outside like that or do you go back & make some kind of a cover later. Or is this the subject of a future tutorial?
Glad you liked my Halloween picture--the other favorite place was a little old victorian house with a picket fence and entry arbor where the people made these giant painted mushrooms in their yard--looked like papier mache, but it was something else. Their stereo was blasting out the windows--Jefferson Airplanes "White Rabbit" song as we walked up & "Alice" was giving out candy. It was great. We felt like we were tripping in 1969.
Christine
http://passionforpainting.blogspot.com
LOVE that last photo, the colors and little house stunning...I'm not a journaler but the distressed paper is fab...
Steph
Fabulous post Judy, thanks for the tutorial, another thing I'll have to have a go at. I decorate brown paper bags by dipping then in water, squeezing them out and laying them flat, then painting and stamping them, the creases add great texture and design.
Ro
xo
thank you so much for sharing this tutorial - what a fun project this will be!
love your invitation to come to the wild side...yes, yes, yes!
Love the tutorial... And the little snippet about the motel! :)
I am in such awe of your journal pages--they are so colorful and fun! And thank you for the tutorial. :)
Thanks for the tutorial!
I love the Marina photo - it's very haunting.
Judy: You are always so generous with your techinques and projects. What a great way to recycle! I appreciate the time and care you took to create this tutorial. :D
I love the tutorial, Judy, and the pictures of old 99. I grew up in Portland, and I know EXACTLY that stretch of highway! What a treat to see that photo.
Thanks for the tutorial--I wouldn't of thought to iron the paper after wetting but it looks great after you do that--all weathered and imperfectly perfect!
I have got to get the new CPS--last time I went to the bookstore it wasn't out yet :(
Ahh Judy, my love, always up to new and interesting kinds of fun. Oregon City Marina, oh what a haunting beauty that is.
And what a GOOD tutorial.
How could I forget to mention that dazzling array of new pigment? Or the journal page bursting at the seams with WORDS. What a juicy post!
Love this blog entry. It is so varied and interesting. I have been saving some nice brown bags and this book will be their next life. Thanks for the tutorial. Your studio looks great.
thank you for the great tutorial on grocery bag journals! I LOVE IT! I mentioned it and your delightful CPS artist profile on my new art blog mixed media play! xoxx, Renée
Have I told you lately how amazing you are? :-) LOVED your article in CPS, and this tutorial is fabulous as well!
love this tutorial, and the freedom of making a fun journal. I've never been one for measuring either.
Judy, loved your article in CPS which directed me to your blog. Thanks for the tutorial on the paperbag journal. Is this the base of your fabulous journal pages?
I haven't been able to stop thinking about making this journal since I first saw it. I have a stack of paper bags and am about to start the process. Thanks for the great tutorial!
Judy, that was so much fun! I made it through the last bit of ironing and will stitch them tomorrow. I had to give you one more big THANK YOU for the tutorial. It was super easy with your photos.
What a great tutorial... Thanks! I've made paper bag scrapbooks with the smaller lunch bags before. You don't take them apart and you use the openings for pockets.
I like your idea here as well. The big bags are strong and there is a flexibility of size. I will have to give it a try!!
Hi,
What is the "spray" you speak of when you are ironing?
Artful Blessings,
Kathryn
The "spray" is a mist of water. You squirt it on the dry paper so it will iron out real flat.
that is fabulous, I want to make one!
I love this idea to recycle old brown paper bags but I have a question. What do you do if there is printing on the bags? Is it hidden somewhere?
Love the blog,
sunangel
Sunangel, I paint those pages white before doing other things to them.
Thank you....
Your pics have inspired me to make a scrapbook of last summer on one of these journals......
That looks like so much fun! I've been wanting to try a little journal making, and this looks like a great way to jump right in with both feet.
Thank you so much for this tutorial. My granddaughter loves drawing and writing all over everything. This paper bag journal project will be a fun way to create a journal for her and one that she won't possibly be able to mess up because the messier she gets in it the better. :) The pics were awesome and I loved the Bates Motel story. It's been years since I've been tthrough that area, 25 at least. I so love the color of green in the pacific northwest region.
What is the gel you use? Ive never made a journal and dont know what to get. Can it be found at a hobby lobby or only an art store? Love this tutorial!!!!!
great journal idea. And I love the photographs! {:-D
I really love the concept and the execution! You did an excellent job of laying this out for everyone. Thank you.
BTW, one of the things I like to do is to write down what the word verification is and give a definition for it. The word verification for leaving this comment is "cuseboy." A cuseboy is a young man who gives positive reinforcement for doing creative and wonderful things. His nemesis is "excuseboy" who has an excuse for never doing anything.
I like the way you soak the material--it adds another dimension to the look!
I LOVE this idea!
Sheila in Woodburn
Love this! Thank you for posting!
Thanks for the steps. We are working on a book making badge for girl scouts and have done a few different ideas. This one was so easy. I did not have to tell them to cut 8 X 10 pages. I told them what we were doing and they created their own size. And I hurt oh no it is too torn- nope- keep going. How many pages?- how many do you want? We have create the books and plan on painting and adding in two weeks. I can't wait to see what they create.
what kind of adhesive did you use for the spine/fabric?
I used acrylic gel. Very sticky.
found you on pinterest.
this is all new to me.
what is the purpose of the white 'fabric' on outside??
thanks for lesson
barb
Thanks for the great tutorial. I made a book similar and now I want to make one like yours too.
This was such a treat to find.....thank you & I love learning at your feet !!!
You are the poster child for journaling, it obviously has fed your creativity. I am percolating ideas for an idea journal for a sewing retreat in April, and as little gifts for my sister and daughter who are also attending. Your book is perfect! We will need a place to get addresses of all our new friends! I will add a few sheets of graph paper for quilt inspirations. Happy Creating!
Hi Judy. How long did you soak your bags? Mine are not ironing as flat as I would like them--too many wrinkles. I thought this might make a difference in breaking down the fiber.
I dont remember soaking them for a long amount of time, Beth. You might try squeezing them out and then putting them through one more round of soaking and squeezing if they need more softening.
So beautiful & simple. These would make great gifts for parents & loved ones!
thanks for the wonderful tutorial!
looking forward to trying it out
Found this post and your blog through Pinterest - LOVE this idea - can't wait to try it - gonna go check out the rest of your blog now!
I love this! And your explanation is as delightful as it is informative. I found this through Pinterest.
I have a question I hope you can help me with. I'm going to lead a 6-wk art workshop with mentally disabled adults. I'm not an art therapist, just a simple artist who believes the desire to create is in the human DNA. Do you have any ideas or references for working with this particular population? I've been googling for ideas for over an hour, more like three ... and that's just today. I must be putting in the wrong parameters.
Any leads would be so appreciated.
Artfully yours,
Marti Grace Ashby
Judy, I'm new to book making. What is a "signature"?
Seven years after you posted this tutorial and it's still amazing. Loving this so much, my girls and I are going to make a "spell book" for Halloween, and this is perfect! :D Thank you.
Thanks for sharing this great tutorial! I made one of my own recently, http://limeriot.blogspot.com/2014/09/floppy-sloppy-grocery-bag-journal.html, and linked back to your great instructions.
Hello Judy,
I enjoyed your tutorial. Could you tell me why you wash and iron the paper? And what did you wash and spray the paper with?
Many thanks,
Wade
Wade, I wash and iron the paper to get the beautiful crinkles. When I'm done it looks like leather. I washed and sprayed the paper with water only.
Oh, these are so perfect for my family! We homeschool and my oldest is a buddying artist. She loves making nature journals and I can see us making these to use for years to come. Thank You for adding some sparkle and shine to the world with your ART!!! Olivia
Don't measure...it's not that kind of book.....an aha moment for sure....and the most freeing statement I've read in a while! THANK!
I love this tutorial, we can make paper bags of waste paper material is all around us.
Hello love your tutorial . Have a question, what could you use other then the gel?
Linda Batson, Elmers Glue or any wet or damp adhesive.
Great tutorial, instead of cheese cloth can use a used fabric softener sheet!
Judy this is absolutely clever! I have Soo much cheesecloth because it was the only size bag I could find in my neighbourhood & had no idea WHAT I was going to do with it! We love journaling! This tutorial is Soo Useful & helpful! Thank you so much!
I love the Bates Motel. What fun. Where is this? I would love to visit the town.
Stephanie Sams, the location is on 99E driving south from Oregon City. Unfortunately, the "Bates Motel" has been torn down. The beautiful 2 story house next door, however, is still there. This is all outside of Portland, Oregon.
Love the tutorial. Can't wait to try it. I am going to teach my grand daughters this. Thank you for the post.
Post a Comment